A month ago, my partner and I were in the middle of trekking Killarney’s La Cloche Silhouette loop trail. It’s hard to believe so much time has passed already, but as another long weekend approaches and we begin to plan our next trip, we’ve got some things to adjust. Preparing for a trek can at times be tricky, but now we think we’ve made some big steps forward.
Marc and I usually hike in to a campsite, set up for the weekend, and hike back out a few days later. When planning for our Killarney trip, we took into consideration that I hadn’t been on an actual trek — hiking to a different site every day — in three years, and this was Marc’s first time.
We had spent quite a bit of time shopping for missing gear and preparing our food, but during our trip, we noticed areas that could still be improved.
So, since we’re not sure yet where we’ll be heading for Canada Day weekend, we want to be ready for either type of trip.
Update:
Check out the Backpacking Meal Plans, Packing Lists, and Tips for Hikers and Casual Paddlers series to see how we’ve adjusted our equipment to prepare for our treks.
Preparing Gear For a Trek
Before heading out to Killarney, we figured Marc needed a raincoat and/or windbreaker, new hiking boots, and a decent pack.
We reckoned a second water bottle with built-in filter would come in handy, while camp utensils instead of silverware would help reduce our pack weight.
We stocked up on fuel for our camp stove, straps and clips, and stuff sacks.
We bought, for the first time, odourless bags.
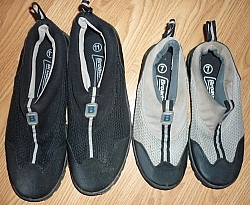
For water crossings, we got water shoes.
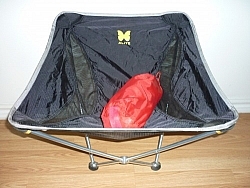
Finally, we invested in a little trail comfort and bought awesome lightweight camp chairs and pretty cool sleeping pads.
We got most of the gear from MEC, a little from Canadian Tire. Too much, though (frowny face).
Gear We Already Had
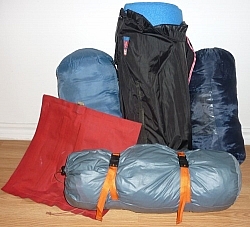
- Tent and sleeping bags
- Trowel
- Cookware and dinnerware
- Bug vests
- My raincoat and a wind jacket for Marc
- Technical hiking clothes (pants, socks, shirts, base layers)
- Hiking poles
- Foldable water basin and camp suds
- Pocket knives
- Flashlights
- Bear spray
- First aid kit (including tweezers which we used for tick removal)
- Wilderness emergency kit (containing a whistle, compass, wire, waterproof matches, hand warmers, fire starter, emergency blankets, pen flare, rope, duct tape, sewing and tent repair kits, and spare boot laces)
Other Stuff We Packed
- Toques and baseball hats
- Gloves, sleeves
- Inflatable pillow
- Camp clothes and shoes
- Meds for Fetcher, dog leashes
- Homemade natural bug spray
- Toiletries
- Watch (so we wouldn’t have to use our cell phones)
- Garbage bags
- Clothes and food for the car ride home
Stuff We Decided to Leave Behind
- Dry bag
- Camp toaster
- Backpacking grill
Gear Notes
A few words of explanation here.
First, Fetcher is about 12 years old and has arthritis. He’s been to the vet a couple of times since autumn, and the consensus is that he should continue to hike with us as long as he enjoys it. His medication really helps him make the most of each hike. We couldn’t bring him without it (frowny face).
Second, while Marc and I can wear bug vests, the dogs can’t, and camping in black fly season can be killer for them. Of course, I won’t buy DEET or other chemicals, so what’s a greeniac to do?
A bit of online research and a chat with my sister revealed the perfect solution: homemade natural bug spray! All we had to do was check the right oils for our purpose (black flies) and the quantities/proportions.
For bites, I read online that making a paste with water and baking soda would help relieve the itching.
Preparing Food For a Trek
We did a lot to change what we normally pack for a camping trip. Preparing for a trek of this length takes a lot more planning, but we like to keep things as simple as possible.
Since we usually hike in, set up, explore from there, and hike out a day or two later, we normally don’t mind being a bit heavier on Day 1. This time we knew we would mind, and that it wouldn’t just be Day 1. So we tried to plan accordingly.
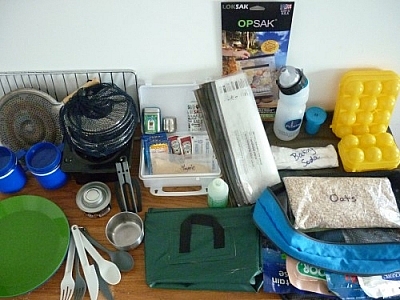
In the middle: Folded wash basin, camp suds, odourless bags, spice kit (tea and steeper, salt and pepper, vitamin powder, ketcup, vinegar, maple sugar).
On the right: water bottle with filter, baking soda, egg holders, travel bag with oats and dehydrated meals
We brought only cook-in-bag dehydrated meals for our dinners, and also for our lunch side dishes (usually hash brown potatoes, but we splurged on South Western couscous for one day). We brought eggs to go with that (packed in hard cases).
For breakfast, LoonSong Garden oatmeal and trail mix made with our own dehydrated strawberries and raspberries as well as nuts and seeds, accompanied by Happy Camper nettle tea from Boreal Forest Teas.
Snacks included a different type of trail mix with more of our dehydrated berries, and also our own dehydrated bananas and apples (the latter picked ourselves on Manitoulin Island), our own toasted pumpkin seeds, and a different mix of nuts and seeds.
We also brought apples, energy bars, Babybel cheese (which is waxed and so keeps fine without refrigeration), our own homemade dehydrated yogurt rolls, vitamin powder, M&Ms, and Pringles (which come in sturdier packaging and don’t get crushed up easily).
And we got pudding for the car ride home (smiley face).
Finally, since we were preparing for a trek with dogs, we bought three different types of treats plus compressed meat rolls that don’t require refrigeration and pack a huge nutritional punch without the volume of dry food.
Cans are not permitted in the park, and canned food would be too messy anyway, plus the smell and weight of the trash would be annoying, at the very least (attractive to bears, though).
The rolls are wrapped in plastic, and while the package does say it needs to be refrigerated once opened, with two large black labs with us, we used up about four fifths of a roll each day, so we never really worried about it.
The downside: they weigh 2 kilograms each, and we brought four!
Yeah, that was all in Marc’s pack…
Packing For a Trek
Once we got all our stuff together, it was time to organize it all so we would a) know where to find it, and b) be able to get to it when we needed it. Luckily, most of our gear is already organized (all the time, ready to grab) in handy travel bags, so the effort was really for the food. In this regard, preparing for a trek was the same as any other camping trip!
Our Travel Bags
- One for toiletries, including sunscreen, camp suds, meds, toothpaste, first aid kit, etc.
- One for cooking gear: nesting pots and pan with lids, deep-dish plastic plates, mugs, folding spatula, cutlery, tea steeper, measuring cup, and camp stove
- One for emergency and camp gear: spare wind-up flashlight, deck of cards, rope, emergency kit, duct tape, pocket knife, and multi-tool
- A smaller one for easier access to hiking gear: whistle, compass, multi-tool, pocket knife, pen flare, sleeves, spare boot laces, water bottle holders, spare clips and straps
- One for towels (2 tea towels, 2 wool-knit dish cloths, 1 hand towel, 2 face cloths, 2 light beach towels)
- One for food (contents described below)
- A smaller one easily accessible for snacks, refilled each morning at camp
- A hard-cased homemade spice kit containing (in baggies): parmesan cheese, baking soda, salt and pepper shaker (mixed together), ketchup, vinegar and mayo packets, Sucrerie Séguin maple sugar, and vitamin powder packets
- A large stuff sack for our clothes, plus a spare for dirty laundry
Packing Food
For food, I took everything out of any bulky packaging (for example, the box the dog treats came in) and put it in resealable plastic freezer bags (we always wash and reuse ours). Huge space saver! I also measured out amounts exactly (for example, our breakfast oatmeal). We did bring food rations for one extra day, just in case… I pre-washed the apples since otherwise we would have to use filtered water. Bonus: the dogs eat the cores, so it’s a trash-free snack! I left the Pringles in their tube, though, since I had bought them precisely because of their sturdier, if not squish-free, packaging.
Everything then got organized once again into large Loksak Odor Proof Barrier Bags (to help prevent unwanted visitors of the ursa variety at night), before being neatly stored in a travel bag.
Our Odourless Bags
- Bags 1 and 2: Food (except the dehydrated meals, the spice kit, the snack bag, and the eggs)
- Bag 3: Dog food
- We would have needed one more for toiletries…
Packing Notes
Well now to put it all in! We have two backpacks, each 60litres + 10. Marc was obviously getting the heavier stuff, but how to do that to him without killing him? Not to mention that I hadn’t carried anything heavy since last year’s Rib Mountain trip, which had been really tough on me. I was determined to pack smarter.
I knew I had read years ago about how to properly pack a bag, but I needed a refresher about weight distribution. I’d been putting the heaviest stuff on the bottom, forgetting how that drags all the weight down on the hips and shoulders. And I hadn’t really been putting too much thought into accessibility other than what might be needed on the trail.
Once we got everything packed in, clipped on, and strapped tight, we weighed our bags. Marc’s was 15 pounds over target and mine was 10 pounds over. We’d done a test a few weeks before, without food, and had thought we’d be ok, but in the end, the food still weighed more than we had imagined.
What We Learned About Preparing For a Trek
There are a few things we improved on along the way during our trek. Preparing for a trek doesn’t end once the trek starts, it seems! We rethought quite a few of our strategies along the way, meal planning being one of them. Realistically, we were never going to be cooking eggs and washing dishes at lunch, and in fact we opted to skip lunch the first two days of our trip because it was too much of a hassle. So we began having our dehydrated meals at lunch instead of dinner. Marc would boil the water and stir it into the package in the morning, then we’d pack it up in an easy-to-reach spot to eat for lunch (rice dishes work better than pasta ones).
Looking back, I would possibly adopt this method for breakfast, too. We usually find the oatmeal too heavy first thing in the morning anyway, so packing it up to eat at first break would probably work well (we like it cold, too, so that’s not an issue).
In future, I would leave out eggs and apples for a trek. They’re fine for a hike-in-and-settle-down trip, but they’re just too heavy and bulky to lug around every day.
We also discovered the importance of finding out ahead of time whether there’s a fire ban. If not, then we can bring much less fuel since we prefer to cook over the fire.
We wouldn’t bring inflatable pillows again. This was the first time we did, thinking it would be more comfortable, but filling our sleeping bag stuff sacks with sweaters and clothes was actually thicker and comfier.
Even though we only used our water shoes for water crossings on the first day, we’re still glad to have brought them along since Marc used them for swimming a few times, and I wore them on a few lunch breaks to give my feet a break from boots.
Now, the reason we wore them on breaks was because we had simply clipped the shoes to the outside of our packs and so they were easily accessible. However, I would prefer to pack everything inside our bags from now on since it was impossible to fit the rain covers over them, and stuff got snagged on rocks during descents, branches the rest of the time. Still, they would need to be packed efficiently for ease of access at water crossings. If we pack them in dry bags, we can put them back into our packs without getting the rest of our gear wet.
Stuff We Didn’t Bring But Should Have
- Backpacker’s grill (we brought a bunch of fuel instead!)
- Dry bag (we would possibly even need a few more of these)
Stuff We Need to Buy
- Lightweight camp clothing (a t-shirt, pants and fleece sweater each)
- Climbing gloves
- Rain ponchos large enough to cover packs
- Dehydrated dog food — I didn’t know it exists until I looked it up writing this post; how silly not to think of it before! This will really help reduce pack weight! I figure we can save about half the weight, but the downside is, it’s about twice the price. It seems way healthier for the dogs, too, though, so it may be worth it.
- More Loksak Odor Proof Barrier Bags
- Lightweight, quick-dry camp linen (towels, dish cloths, etc.)
- More travel bags for organizing clothing instead of large, hard-to-organize stuff sacks (we have enough smaller ones for food and gear only; we can still use a larger one for dirty laundry)
- Lightweight tarp and large mosquito net for a quick, easy shelter during lunch breaks and for the dogs at camp
- Tick twister, for easier and more effective emergency pet care
Our camp shoes also need to be switched up. I have hiking sandals I should have brought (I chose light canvas sneakers instead, which are heavy when wet). Marc brought his big heavy running shoes, so we’ll need to get him hiking sandals or light trail runners instead.
We also need to buy a new pack for Marc.
His brand-new, never-used pack broke on the very first day of the trip, on our first or second break. The buckle on his hip belt broke as he was tightening it after putting it back on. The clip still worked fine, but the right-hand strap wouldn’t tighten, so I knotted it as best I could and we continued that way.
A few days later, the same thing happened on the left side! We bought the pack at Canadian Tire knowing we weren’t getting the best product but expecting it to at least last the first trip! So we’ll be returning to MEC sooner than we thought…
Conclusion
And hopefully we’ve learned enough lessons that preparing for a trek will be easy for our next trip, wherever it may be.
Update
Check out the Backpacking Meal Plans, Packing Lists, and Tips for Hikers and Casual Paddlers series to see how we’ve adjusted our equipment to prepare for our treks.


Hi, Just wondering how your dogs did with the La Cloche Silhouette Trail? I’m planning on going, but have a large dog, and am worried about the Crack in particular. Thanks, Ashley.
Hi Ashley! If your dog is in good shape, climbing up or down The Crack should be fine. The dogs find ways through the gaps in the rocks that we can’t get through, so they might actually have an easier time of it than us ;)(winky face). There’s just one spot on the way up The Crack where I can recall giving the dogs a little boost up.
There’s one other spot I can think of on the La Cloche Silhouette Trail where the dogs might need a bit of help. If you have the La Cloche Silhouette Trail Guide, you can find the description of the section I mean at page 122. It’s at the point where you’d be going up or down the side of a waterfall, depending on the direction in which you’re hiking the trail.
Hope you have a great time — it’s beautiful!
Congratulations on doing that trek! It’s on my list, and I appreciate the info you provided — very helpful and insightful!
Thanks! It was definitely worth it (smiley face). Glad you found the article useful!